Showing posts with label crafts. Show all posts

Monday, September 3, 2012

crafting with blendy & becky: bath bombs

Finally Blendy and I did a craft together again! I'm woefully late in posting, as we did this craft in July ...

Who doesn't love a nice bath? (Okay, so I know a lot of people who don't ... but I sure do!) These bath bombs are easy to make and fun to use. I found the recipe on Pinterest (of course). I'd been wanting to make these bath bombs with Blendy for months—Pinterest tells me I pinned it 28 weeks ago—but we just never got around to it until the Olympics started.

I adapted this recipe from the one found on Pinterest to work with the ingredients I bought.

Step 1: Gather your materials—one 16 ounce box baking soda, 7 ounces of citric acid (I found mine on Amazon), 4 tsp scented massage oil (or 4 tsp olive or unscented massage oil and 10-20 drops essential oil), water in a spray bottle (I used a rinsed out spray gel bottle), mold (I used a 1/3 cup measure), large bowl, whisk, baking sheet.

Step 2: Dump baking soda and citric acid into bowl and whisk to combine.

Step 3: Gradually add oil(s) and mix in. (Essential oil is very strong, so start with just a few drops and then add more until you reach the desired potency.)

Step 4: Spray a little water onto the mixture and whisk in. The amount of water you need will depend on humidity—I only needed two sprays, but in the middle of winter, I'd probably need much more. The mixture is perfect when it will hold together when you squeeze it.
When your mixture looks like this, it's just right.
Step 5: Pack into your mold and gently unmold it onto a cookie sheet.

Step 6: Allow to dry overnight. (Seriously. You'll be tempted to touch the bombs, but you need to leave them be for at least 24 hours. I learned this the hard way!)

Step 7: Store in an airtight container or package individually to give as gifts. Enjoy!

My recipe made eight bath bombs. Each one will fizz for about 45 seconds. It's so much fun to use these—just look at Blendy's delight as we were cleaning up!

If you're looking for a fun, easy project, try out these bath bombs!

Thursday, July 19, 2012

crafting with blendy & becky: vbs crafts

In June, I did a ton of crafting (all without Blendy) ... because I helped with VBS at my church, and I worked in crafts! We made one or two crafts each day, depending on the time. I had an absolute blast with the 18 kids who were part of the crafts camp! My official role at VBS was to be the special buddy of an autistic girl. She participated in crafts, so I did, too, and in the process got to know some really cool kids.

I'd forgotten how much I enjoy being around kids. That sounds strange coming from someone who works at a school, but I'm not really around the young ones much. (That's not to say I don't enjoy the older ones ... you know I do!) When I quit helping with Awana at my parents' church two years ago, I was really burned out, and though I missed the kids, I knew it was time for me to step back. My experience with VBS reminded me just how great kids are! While I'm not ready to work in children's ministry on a weekly basis, I will definitely keep helping with VBS!

So during VBS, I made a lot of crafts, but I only got pictures of two: a tissue paper cross and prayer hands. I won't go into great detail on how to make these crafts—this post is basically just to prove that I did complete a craft project in June! (You can see my other crafting projects here.)
The tissue paper cross is pretty simple. You cut a cross shape out of cardboard, use a hole punch to make a bunch of holes, and stick tissue paper through them. Or you could just buy the kit from Oriental Trading!

The prayer hands are also ridiculously simple...but you'd probably have to buy hand cutouts somewhere. You just paint them (see how artistic I am???), and when they're dry, glue each hand to one side of a clothespin. Then you can hold prayer cards (or recipe cards) in them. Once again, here's an example from Oriental Trading.

Our July craft is going to be bath bombs, and Blendy will be doing this one with me. Stay tuned!

Sunday, June 17, 2012

crafting with blendy & becky: book page flowers

For our May craft, Blendy and I decided to make these book page flowers. I wasn't sure at first if I could make them—we've already established that I'm not naturally very crafty!—but they were surprisingly simple. I couldn't believe how quickly I picked it up, and soon I could form the petals without really thinking.

Rather than give you step-by-step instructions, I'm just going to point you to the site I used. Their pictures make following the directions incredibly easy.

Before we could start making the flowers, I had to decide which book I was willing to tear apart ... not an easy task for someone like me who loves her books! Then I remembered this book. I got it through Vine, and their rules stipulate that reviewers can't give possession of the products received to anyone else, though they can dispose of the product after a certain amount of time. Well, I still had the book on my shelf, and there was no chance I'd ever read it again ... so making book page flowers out of it seemed perfect!

Like I said before, you should go to this origami instruction website for directions, but here are a couple things I learned from making my flowers:
Make a template, then trace as many as you can onto a piece of paper. I found that when I was just measuring (say 4" x 4"), I often wasn't quite accurate ... so each petal of my flower was a slightly different size. Tracing a template eliminated that problem.

Also, use pencil, not pen (as I did), to trace the template. If I didn't fold the petal perfectly, I often had a little black showing through.

At first, the flower making was slow going, but soon I could complete a flower in about 15 minutes. It's perfect busy work while watching a movie or chatting!

Here are my completed flowers on top of the book I "sacrificed" for this project. (Side note: I helped with VBS at my church this week, and one of the daily lessons was on sacrifice—how Jesus sacrificed his life to save us. The teacher did an illustration using q-tips and money showing that not everything we are asked to give up is a sacrifice ... and I think this book would fall under that category!)

I'm not sure yet what I'm going to do with the flowers—I guess I'll put them out as decoration somewhere. Aren't they cute?

Sunday, May 20, 2012

crafting with blendy & becky: rice heat therapy bag

The title of this post should actually be "Crafting with Susan & Becky"—when I told Blendy I wanted to make these rice therapy bags (discovered through Pinterest, of course) for our April craft project, she politely declined. So I turned to the woman whose help I would have needed to enlist anyway: my mom!

I think the last time I used a sewing machine, I was a freshman in high school. The sewing part of Home Ec was rather tramatic for me—we were required to make items of clothing and then wear them to school. This was bad enough on its own, but the day I chose to wear my terrible plaid jumper was also a day I stayed after school to work on yearbook. So did my cousin, who was responsible for the yearbook page of the yearbook ... and she took a picture of me working on my spread. So my horrible jumper is now immortalized on the pages of The Reflector. After that experience, I swore off sewing ... until now!

Apparently, when I swore off sewing, I really swore it off because I remembered virtually nothing. My mom had to basically hold my hand the whole way through—from cutting out the fabric to pinning it together to threading the sewing machine to actually sewing!

If you want detailed instructions, you should really go to "Sew, Mama, Sew!"—the site that inspired me. They give great directions! I didn't really follow their directions, though—I needed something simpler. So here's what I did ...

Find a fun fabric for your bag. Or you could do what I did and raid your mom's fabric scraps! (I didn't care if my bag was particularly beautiful ... after all, I was going to be the one sewing it!)

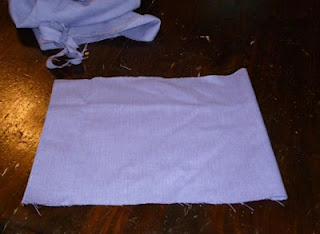
Cut fabric into approximately 8x20 inch rectangle. Fold in half to create 8x10 inch rectangle. If you have a fabric that doesn't look the same on both sides, be sure to fold so the right sides (what will be on the outside at the end) are together.

Pin on the three non-folded sides. Leave about four inches unpinned.

Sew. Try to keep your lines straight. (I was very bad at this.) Be sure not to sew the unpinned section.

Trim the edges and turn the fabric right side out.

Pour two pounds of rice into a bowl. Add 10-ish drops of essential oil and stir together. (You may need more or less—adjust until it smells right to you. I went WAY overboard with my cinnamon bark. Repeat after me: Less is more!)

Carefully fill bag with rice.

Stitch the hole closed. (Sorry, I can't give better directions for that—I did what Mom told me to do, but I don't think I can accurately describe it!)

To use your bag, heat it in the microwave in 30-second increments until it's as warm as you'd like.

Enjoy!


Note: This really was my April craft, and I did everything up to the rice part in April. It just took me a while to get my essential oils, so I finished in May.

Saturday, April 7, 2012

goals for 2012: march update

"Commit your way to the Lord; trust in Him, and He will act." Psalm 37:5

No, that verse doesn't really have anything to do with this post. But when I read it this morning, God used it to speak to my heart, so I wanted to share it!

In the month of March, I feel like I just kind of ... maintained. Made some strides in some areas, slipped back in others. It definitely was a better month goal wise than February, but not as good as January.
  1. Read through the Bible. Well, I'm still "on track"—meaning I still have two months of catch-up days I can use! I pretty much maintained in March—I definitely didn't read every day, but I did read more than in February. So far, April is going better!
  2. Exercise four times per week. The Ja-La-Sta Walking Challenge ran through March 31, and I averaged 5,406 steps per day in March. I stopped marking my exercise time on my calendar a long time ago, but I think I exercised about four times per week. Here's to an even stronger April!
  3. Lose 30 pounds. My diet went really well for the first three weeks. Then I went on a trip. Then I went on another trip. I've found that it's virtually impossible to follow this diet while traveling ... or else I just don't have the willpower to make it happen! Still, I'm down four pounds, so just six to go until I can start watching Monarch of the Glen :-) Also, I can tell that my clothes are fitting better!
  4. Travel somewhere new. It depends how technical we want to get here. For Blendy's birthday, we went to Wichita, a city I've visited many, many times. But the purpose of our trip was to visit the Warren's balcony theater, a place we'd never been. Still, I want to travel to a completely new city or state this year ... right now, I'm thinking maybe Wisconsin or Arizona. (I don't know why, and I'm still open to suggestions!)
  5. Complete one crafting project a month. I failed. Completely. The end of the month just snuck up on me, and I didn't even get one picked out, let alone completed! Maybe I'll double up in April ...
  6. Learn to say "no." Yes! About a week ago, I had the following conversation with our Activities Director:
    AD: Do you have a minute? I need to ask you something.
    Me: Does this have to do with coaching drama? 'Cause the answer is no.
    AD: Good meeting! 
    In the end, we talked a bit more, and I agreed to help with drama—but I made it very clear that I would not be the coach!
My goals have definitely suffered a bit in the last two months. How are yours? Are you still going strong? Have you given up? Or, like me, are you just maintaining?

Saturday, March 3, 2012

goals for 2012: february update

Remember how high I was at the end of January? How well I was doing with all of my goals? Well, February was crash-and-burn month for me. I could blame my trip to Indiana, the cold/cough/ear infection (did you know adults get ear infections? I didn't ... until that's what my doctor told me I had) that has hung on for 10 days, or speech (my favorite whipping boy this time of the year) ... but really, the blame lies with me. My laziness. My complacency. Things are turning around, though, so I hope my March report will be much happier!
  1. Read through the Bible. At the end of January, I was a little behind. At the end of February, I'm super behind! I'm still on track to finish well before the end of the year, but I need to keep focused. Sadly, this is the first thing to go when I'm feeling rushed or stressed or tired.
  2. Exercise four times per week. I'm probably averaging three, and I really dropped off in the J-La-Sta 10,000 Steps Walking Challenge (I averaged 4,355 steps per day). I did exercise the last three days of February, though, thanks to my new diet. Since I'm committed to it through March 24 and it calls for exercise six days per week, I think my March stats will be better!
  3. Lose 30 pounds. I ended February exactly where I began February ... which means I've been in a holding pattern for two months, as I also began and ended January in the same place. I have high hopes for this diet, though—I even bought myself an "I'm going on a diet" gift, the first two seasons of Monarch of the Glen (you may recall that I do love me some Monarch!), which I won't allow myself to watch until I've dropped the first 10 pounds. My first official weigh-in on the diet comes tomorrow morning ...
  4. Travel somewhere new. I did go to Chicago and Indiana in February, but I'd been there before. Still thinking about where I want to travel this summer! (And I'm open to suggestions ...)
  5. Complete one crafting project a month. Done! It wasn't a craft in the traditional sense of the word, but I'm pretty proud of my birdseed cakes
  6. Learn to say "no." I actually didn't have much opportunity to do so in February. I passed on a couple reviewing opportunities, but those were ones I would have passed on even before this challenge.
How are your goals progressing two months into the new year? What has proven most difficult when it comes to meeting your goals?

Wednesday, February 29, 2012

crafting with blendy & becky: birdseed cakes

I found this month's project in my mom's Country Woman magazine. Blendy and I made these cute and easy birdseed cakes while watching the Oscars the other night. (I adapted the recipe from the one found here.)

Step 1: Gather your supplies—bird seed (I picked up a $2 package at Wal-Mart), 2 packages unflavored gelatin (1/2 oz), waxed paper, twine, scissors, mixing bowl and spoon, baking sheet or other flat surface, large cookie cutters (not pictured), 1/2 cup boiling water (not pictured).

Step 2: Cut twine into 14-inch lengths—one for each birdseed cake. Tie ends together to form a loop.

Step 3: Dissolve gelatin in boiling water.

Step 3:  Add 1-1/2 to 2-1/2 cups birdseed to the gelatin and mix well. You can add more birdseed if necessary. (I used 2-1/2 cups—the original recipe calls for 1-1/2.) You want the mixture to be sticky but not soupy.

Step 4: Cover baking sheet with waxed paper. Place cookie cutters on sheet. Fill half full with birdseed mixture and press mixture firmly with spoon.

Step 5: Press the knotted end of the twine into the birdseed. Fill the cookie cutter to the top with birdseed and press mixture firmly.

Step 6: After several hours, gently remove cookie cutters. Allow cakes to dry for 72 hours, flipping once or twice each day.


Step 7: Once cakes are completely dry, hang for the birds to enjoy! (And no, my butterfly cake isn't deformed ... it was windy and cold outside, the butterfly was swaying in the breeze, and I only had the patience to take one picture.)

Yield: Four large birdseed cakes

This project is really simple, and though it requires some patience while you wait for the birdseed to dry, the actual time spent working on it is less than 30 minutes. I think it's worth it! (Now I just hope I see some birds partaking of their treat!)

Wednesday, February 1, 2012

goals for 2012: january update

Here's the first monthly check-in on my goals for the year. I'm happy to report that things are going fairly well!
  1. Read through the Bible. I am a little behind, which has happened just in the last week. The plan I'm on is set to finish up in September, though, so I have a few days to play with! The problem with this plan is that it's so intense (it takes about 40 minutes to do each day's reading) that catching up is difficult. I'm not sure if I'll ever completely catch up ... but as long as I don't fall far behind, I'll be fine. (And I just discovered that YouVersion has a "catch me up" feature that will change your start and end dates so you don't feel so behind ... so my new end date is September 11.)
  2. Exercise four times per week. This is the one I can't believe that I've kept up with! I am exercising for at least 20 minutes per day about five days per week. I look pretty stupid speed-walking the circle around my kitchen and living room, but it works ... and no one is (usually) here to see me, anyway! (Don't worry, I won't wear a hole through the carpet—I also work out on my elliptical, play Wii Sports, and walk outside when it's nice.) As far as the J-La-Sta 10,000 Steps Walking Challenge goes, I had no idea how hard it was to get to 10,000 steps each day! I've logged 140,533 steps in the challenge so far ... and I'm determined to make February more successful than January.
  3. Lose 30 pounds. Um, yeah. Early on in the month I'd lost two pounds, but I've ended the month right where I started it. So I need to work harder here!
  4. Travel somewhere new. I'm going to Chicago and Indiana this weekend ... but I've been there before. So no progress here.
  5. Complete one crafting project a month. Done! I didn't do the one I'd planned (still going to do it or something like it later). Instead, I put nail polish on my keys. See my post about it here
  6. Learn to say "no." Still learning. I did pass on a whole slew of book review opportunities this month. And I decided not to join another Bible study at church after my current one ends—because I have two other Bible studies I'll be involved in! 
If you set goals for the year, how are you doing with them after one month?

Tuesday, January 31, 2012

crafting with blendy & becky: nail polished keys

I intended to do something else for my January craft, but I ran out of time! Blendy was out of town last weekend, so I had to go ahead with this craft without her. I think I was successful even without her guidance!

I've never been a huge fan of key covers, but I also hate shuffling through all my keys, trying to find the one I need to unlock my door. When I saw this on Pinterest, I knew I'd found January's craft project! It's super simple, and you probably already have everything you need on hand!

Step 1: Gather your supplies—keys, nail polish, clear spray paint, styrofoam (not pictured), and Ron Swanson. (Just kidding. Can you imagine what Ron would think of painting your keys with nail polish? Can you imagine what Ron would think of Pinterest?) Seriously, though, this will take a while, so you'll want to have a movie to watch. I mistakenly thought I could complete this project while catching up on last week's Parks & Rec. I was so, so wrong.


Step 2: Coat the top part of one side of each key with a layer of clear polish/base coat. After it dries, paint a thin layer of your desired color on the keys. Repeat until the color is as dark as you'd like. (I used five coats of the metallic purple and three of the others.)


Step 3: After keys are completely dry, flip over and repeat Step 2 on the back of each key. (When you think the keys are dry, wait another 10 minutes just to be safe. I learned this the hard way, and I had to redo the blue and pink keys ... )

Step 4: Once keys are absolutely dry, spray each side with clear spray paint to seal the polish. If you want to do this quickly without having to wait for one side to dry before spraying the other, find an old piece of styrofoam to prop the keys in. Then you can spray both sides quickly and leave the keys outside to dry. (I don't know if you really need this step. My guess is you'd just have to touch up the keys more often if you didn't spray paint them.)

And that's it! Doing my four keys took about two hours—or one episode of Parks & Rec followed by an incredibly stupid Lifetime movie. Seriously, if you read a book that detailed your sister's murder perfectly, wouldn't you be at least a little bit suspicious that the author may have had something to do with her death? But enough about that. Aren't the keys adorable?

Monday, January 9, 2012

goals for 2012: week 1 update

Last Monday, I wrote about my goals for 2012. I intend to do a summary post each month, tracking my progress. I thought it would be fun to do an "after the first week" update, too ... mainly because I'm doing so well right now, and it may be a different story in three weeks!
  1. Read through the Bible. So far, so good. I've kept up with the readings so far. This is helped by the fact that I was assigned a study hall this semester. I just pull up YouVersion on the computer in the classroom and go for it!
  2. Exercise four times per week. Again, I'm doing well on this one! I have a calendar that I've designated as my exercise calendar, and I track what I did and how long I did it. I've been playing a lot of Wii Sports this week, and I've used my elliptical on four different days. I downloaded an audiobook to listen to while I exercise—I've learned that I don't enjoy reading while ellipticaling, and sometimes it's even hard for me to watch TV. For some reason, an audiobook makes the time fly by! I'm listening to James Patterson's Judge & Jury. It's my first Patterson, borrowed from NebraskaOverdrive, which I can access using my library card. Actor Joe Mantenga reads it, and he does a fabulous job.
    I've also joined a walking challenge—The J-La-Sta 10,000 Steps Walking Challenge. I bought a pedometer and everything! If you'd like to join, click on the link above for details—we'd love to have you!
  3. Lose 30 pounds. I think I lost about a pound this week. Why am I not sure? Well, I have one of those scales that can save your weight and tell you how much you've gained or lost. When I stepped on for my weekly weigh-in (I've learned not to weigh every day—that can just make a person crazy!), my scale kindly informed me that I'd gained 54 pounds. Seems someone (who shall remain nameless) weighed herself and saved it. And I can't remember exactly what the scale said last Sunday, but I know it was closer to the 200-pound mark then than it was today.
  4. Travel somewhere new. No progress on this one.
  5. Complete one crafting project a month. I think I've picked my project out. No idea when I'll do it yet. See it here.
  6. Learn to say "no." Well, I passed on one book review opportunity this week. And I tried to turn down the study hall assignment, but that didn't go so well for me. So I decided to look at it positively—if the school wants to pay me to read for 55 minutes a day, who am I to complain?
How about you? Did you make any resolutions or set any goals for 2012? How are they going after the first week?

Monday, January 2, 2012

goals for 2012

I've never really made New Year's resolutions. Never publicly, anyway. I know myself, and I know I will fail. Still, I think it's good to have goals, so I've come up with a list of things I'd like to accomplish in 2012. We'll see how it goes!
  1. Read through the Bible. This has been a goal of mine every year for the last ten or so ... and I haven't accomplished it yet! I always start out so well—but one, two, or three weeks in I fall off the wagon and never get back on. I'm determined to make this year different, and I have a new plan, thanks to Tim Challies. He's created the 3650 Challenge, where you read 10 chapters of the Bible each day using Professor Grant Horner's Bible Reading System. I've used this system before, but I only made it about 15 days in before I got behind and ultimately gave up. A Facebook group has been set up for encouragement and accountability for those who are taking the challenge, and I'm hoping that being part of a community of believers who all have the same goal will help to motivate me! I plan to do the majority of my reading on YouVersion, as they have a reader that will present each day's readings in a chunk, and I can check off each chapter as I complete it. 
  2. Exercise four times a week. If you know me, you know this is a lofty goal—but I'm going to try!
  3. Lose 30 pounds. Another lofty goal ... if I can get the exercise thing down, this will be a lot easier!
  4. Travel somewhere new. It doesn't have to be anywhere exotic (and seeing how my Europe fund is dwindling, it probably won't be!), just somewhere I haven't been before. Preferably with Blendy.
  5. Complete one crafting project a month and blog about it. I've never been much of a crafter, but now that I'm on Pinterest, a whole new world of crafting ideas has opened up to me! I plan to include Blendy in this one, too—'cause she's the crafting brains of this operation!
  6. Learn to say "no." I tend to over-commit myself, especially when it comes to book reviews. I'm getting better—I have let a few offers pass me by—but the question I need to ask myself is, "Do you really want to read this book?" If the answer isn't an unequivocal "yes," then I should probably just say no.  

Monday, December 26, 2011

crafting with blendy & becky: coasters

Perhaps if I start blogging about crafting projects, I'll do more of them. I know I already told you about this project, but Holly wanted instructions. Well, my friend, your wish is my command ... even if it takes me a month to do it!

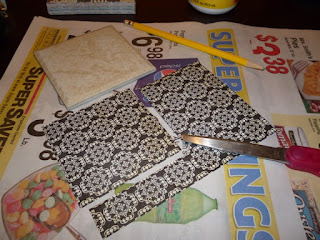
Step 1: Gather all your materials—4x4 tiles, scrapbooking paper, felt, Mod Podge, clear spray paint, glue gun & glue sticks, pencil, paint brush (or sponge), marker, scissors, newsprint (or other scratch paper), and a movie to watch while you work.

Step 2: Cut scrapbooking paper into the size needed to cover your tile. (I like to cover the whole tile with one piece of paper; you can also create a mosaic of sorts with various pieces of paper.)

Step 3: Working quickly, cover the surface of the tile with Mod Podge. Affix paper to tile.

Step 4: Cover paper with a generous amount of Mod Podge. If the surface of your tile is not completely smooth, you may need to use your fingers to press down the paper and remove any air bubbles. Be sure to paint more Mod Podge over any fingerprints!

Step 5: Allow tiles to dry completely. The white Mod Podge will dry clear.

Step 6:
While tiles are drying, measure and cut felt just smaller than the size of the tile.

Step 7: Glue felt to the bottom of the tile.

Step 8: Take tiles outside (or to a well-ventilated area) and spray tops of the tiles. Allow to dry completely.

If you do it with just one piece of paper per tile, the whole process takes an hour or less to complete. And after the initial investment of Mod Podge, spray paint, and scrapbooking paper, the coasters are an incredibly affordable and classy gift!

Monday, October 24, 2011

i am not a crafty person

In either sense of the word.

I have fond memories of doing crafting projects with my grandma when I was a child. Nearly every time we visited, she would have a craft of some sort for us to do, and I still have some of those projects today. (She was good at finding things that would be useful later, like the tea towels she had us paint.) Without Grandma, though, crafting never appealed to me. I think it's because coming up with a project, collecting the supplies, and then actually figuring out how to do things just seemed so daunting.

My sister Blendy, though, got Grandma's crafting gene. And for a few years, she's been asking me to do a craft with her. I always declined. Recently, however, I had a mental leave of absence and actually suggested we do a craft. I'm so glad I did.

I left the planning and implementation up to Blendy. She decided we would make coasters. She bought cheap (33¢) tiles from Home Depot, scrapbooking paper, Mod Podge, felt, and clear spray paint—and with those items, we created some really cool coasters! Our friend Joanna came over to craft with us, and we all three took the craft in different directions, but I think the results fit each of us.
All our supplies laid out and ready to go.
Blendy and Jo work on laying out their patterns.
Jo ended up with coasters that looked like quilt blocks. And yes, she does quilt!
My finished product. I'm going to do four more so I have enough for Bible Study nights!
I'd say my first foray into crafting in the last ten or so years was a success! Blendy and I are already talking about doing another craft with leaves we collect when we're in Indiana next week. She also wants to help me make a Christmas wreath ... it sounds daunting, but I'm sure she'll figure it out!

Are you "crafty"? Do you have any simple-yet-classy crafts I should try? If so, tell me about it in the comments!